Firebease There Was a Problem Contacting the Server. Try Uploading Your File Again

In this tutorial, we are going to build a React Native app that is integrated with a Firebase backend. The app volition back up both the React Native CLI as well as Expo CLI.
This React Native Firebase tutorial volition encompass the main features such as authentication, registration, and database (Firestore) CRUD operations.
You lot tin can as well download the full source lawmaking from Github if you lot desire to jump straight into the code.
This tutorial will walk you through the details of the post-obit sections:
- Creating a Firebase project
- Creating & configuring a new React Native app
- Setting up the binder construction, routes, and navigation
- Implementing the UI for Login, Registration, and Dwelling house screens
- Registration with Firebase Auth
- Login with Firebase Auth
- Persistent Login Credentials
- Writing and reading data from Firebase Firestore
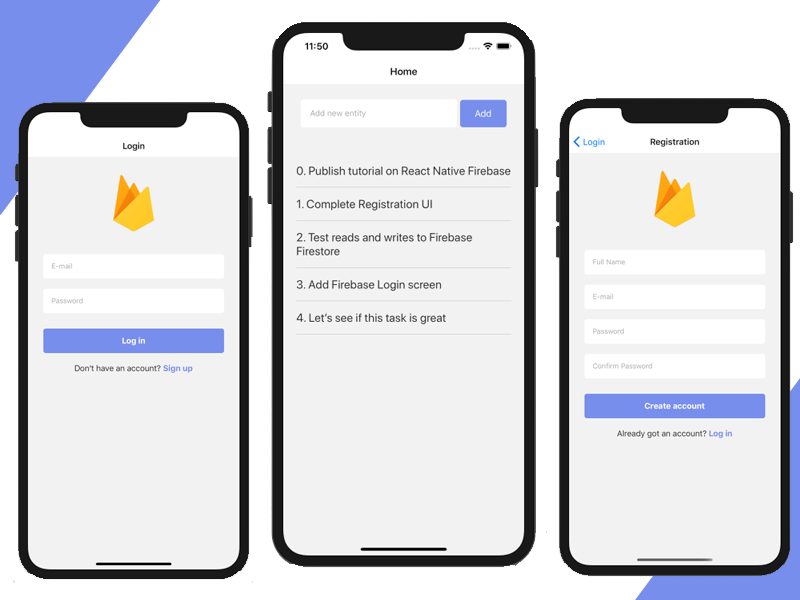
Without further ado, let's start building out the React Native Firebase projection. The terminal mobile app will look like this:
1. Create a Firebase Project
Head over to Firebase.com and create a new account. Once logged in, you'll be able to create a new project in the Firebase Panel.
- Create a new business relationship on Firebase.com
- Create a new project in Firebase Console
- Enable Electronic mail & Password auth method in Firebase Panel -> Authentication -> Sign-in method

- Create a new iOS app, with App ID com.reactnativefirebase
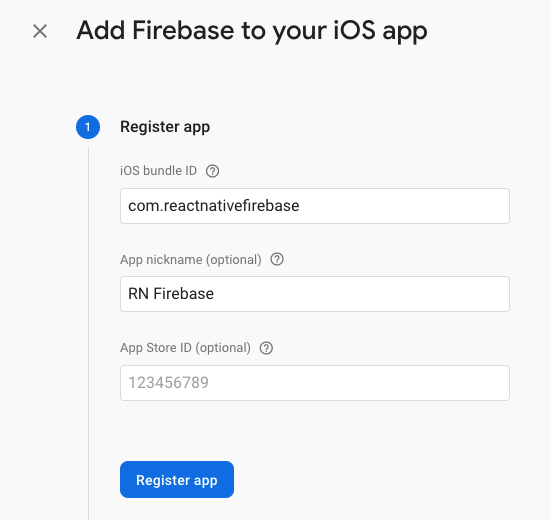
- (Optional) Create a new Android app with package name com.reactnativefirebase
- Download the configuration file generated at the next step to your reckoner (GoogleService-Info.plist for iOS, and google-services.json for Android)
Firebase allows yous to build backendless apps. It's a product running on summit of Google Deject, and allows developers to build web and mobile apps without needing their own servers.
This saves a lot of fourth dimension, since yous don't need to write any backend code. Information technology's likewise highly scalable, existence backed by Google infrastructure.
In Firebase, you'll be able to shop everything that's needed for your app — users, data, files, push notification tokens, etc. All this information is made bachelor to the mobile clients via the Firebase SDKs, which are compatible with React Native. This means that all the interactions with the backend is bathetic out and encapsulated in the SDK, and then mobile developers don't need to worry about API calls, data parsing, sockets direction, and then on.
ii. Create and Configure a New React Native App
We're going to make our React Native Firebase app compatible with both Expo CLI and React Native CLI.
We're going to apply Expo for now, since it makes it easy for newcomers to preview their apps. But we won't apply any Expo specific libraries, and then the src code tin can exist simply used in whatsoever React Native app, regardless of its scaffolding.
We are going to utilize the Firebase Spider web SDK, which is compatible with both Expo and React Native CLI, and is supported directly by Google.
If yous desire to use react-native-firebase instead, feel complimentary to install and configure that (the code will still be the aforementioned). Simply keep in mind that we don't recommend information technology for a few reasons:
- it is not straight supported by Google, so maintaining it will be much harder given information technology's an actress layer that tin cause bugs, and
- it as well doesn't work with Expo, which tin can be a deal breaker for many developers.
The steps beneath are also covered in the official React Native documentation on how to gear up your dev environment.
- Install Expo CLI
In your Terminal, simply run
npm install -chiliad expo-cli - Create a new React Native app past running
expo init react-native-firebase For the template, cull the Managed Workflow —Blank
- Showtime the app by running
yarn ios // or yarn android This will also nowadays you with a QR code which you can scan using the Camera app on iOS, or the Expo app on Android.
This is swell. Nosotros now have a new React Native app, running on both iOS and Android. Permit'due south start connecting information technology to your Firebase backend.
- Add together the Firebase SDK to the React Native project
yarn add firebase - Add React Native Navigation library by running
yarn add @react-navigation/native && yarn add together @react-navigation/stack && expo install react-native-gesture-handler react-native-reanimated react-native-screens react-native-safe-area-context @react-native-customs/masked-view - Add various UI components and packages to exist used in the project
yarn add react-native-keyboard-aware-whorl-view base of operations-64 Create a Firebase config file
mkdir src src/firebase && affect src/firebase/config.js Add your firebase configuration into src/firebase/config.js:
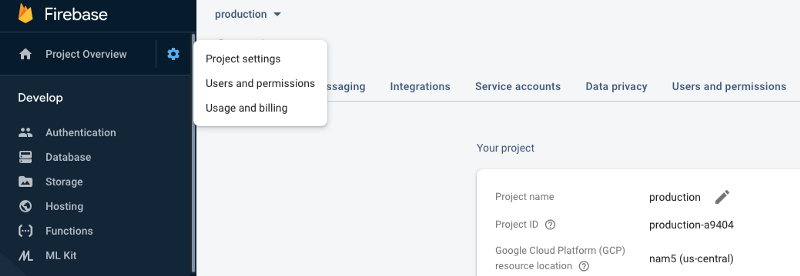
You tin can go all this information from Firebase Console -> Project Settings
3. Create the Folder Structure and Prepare Routes and Navigation
- Create the folder construction by running
mkdir src/screens src/screens/LoginScreen src/screens/RegistrationScreen src/screens/HomeScreen - Create the files structure by running
bear upon src/screens/index.js src/screens/LoginScreen/LoginScreen.js src/screens/LoginScreen/styles.js src/screens/RegistrationScreen/RegistrationScreen.js src/screens/styles.js src/screens/HomeScreen/HomeScreen.js src/screens/HomeScreen/styles.js - Add this lawmaking to src/screens/index.js
export { default as LoginScreen } from './LoginScreen/LoginScreen' export { default as HomeScreen } from './HomeScreen/HomeScreen' export { default every bit RegistrationScreen } from './RegistrationScreen/RegistrationScreen' Don't worry if the project is broken! Everything volition make sense in a little while.
- Set upwards the routes & navigators
Override App.js file with the post-obit lawmaking snippet:
four. Implement the UI
Now that we have the scaffold of the app, let's go alee and implement the UI components of all screens. Nosotros're non going into the details of flex layout and React Native styling, since that is exterior the scope for this tutorial. Nosotros're going to focus mostly on React Native Firebase integration.
Simply override the files every bit follows:
- src/LoginScreen/LoginScreen.js
- src/LoginScreen/styles.js
- src/RegistrationScreen/RegistrationScreen.js
- src/RegistrationScreen/styles.js
- src/HomeScreen/HomeScreen.js
- src/HomeScreen/styles.js
At this point, your app should run properly and brandish the post-obit screens (UI only):
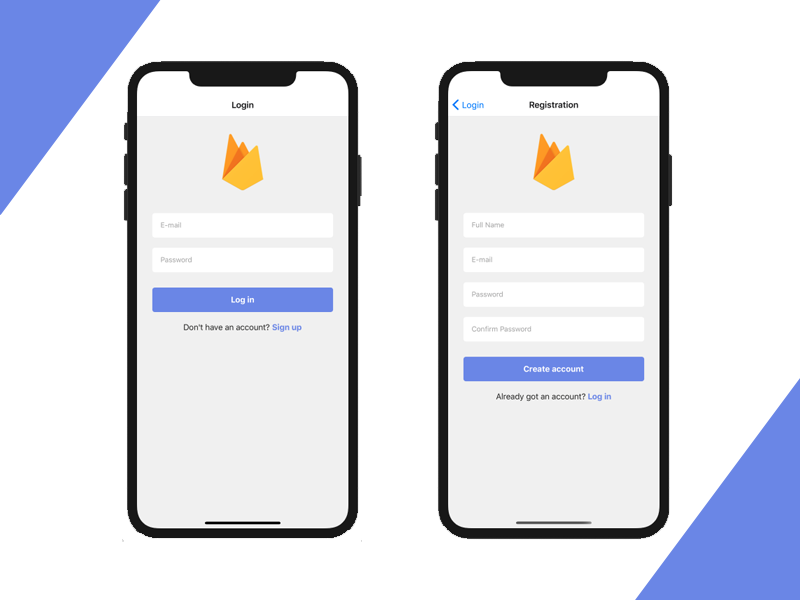
You can switch betwixt the 2 screens past borer the links buttons in the footer.
At present that nosotros take a beautiful UI for login and sign up, let's see how we tin can integrate our React Native (and Expo) app with Firebase.
5. React Native Firebase — Registration
Permit'south start with creating a new account with Firebase Auth, since naturally login comes later. For this, we are going to add the Firebase logic for creating a new account with email & countersign in RegistrationScreen.js, past implementing the onRegisterPress method as follows:
In the account creation flow higher up, we practise a few important things:
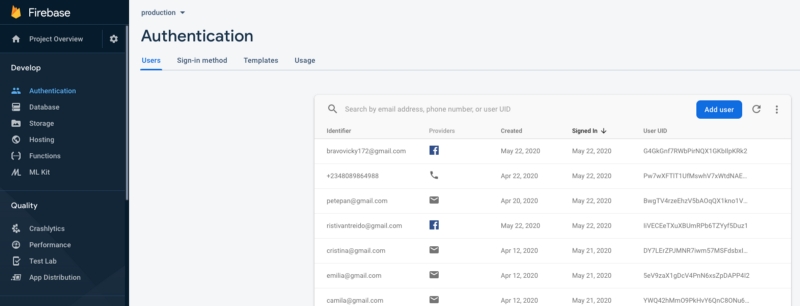
- We phone call Firebase Auth's createUserWithEmailAndPassword API (line 13), which creates a new business relationship that volition evidence upward in Firebase Panel -> Authentication table.
- If the account registration was successful, we likewise store the user data in Firebase Firestore (line 24). This is necessary for storing extra user information, such as full name, profile photograph URL, and and then on, which cannot exist stored in the Hallmark table.
- If registration was successful, nosotros navigate to the Home Screen, by passing in the user object information as well.
- If any error occurs, nosotros simply bear witness an alert with it. Errors tin be things such as no network connection, countersign too short, email invalid, and so on.
Reload your app and examination the registration. If you lot successfully created 1 business relationship, check that it shows up in Firebase Console -> Hallmark:
six. React Native Firebase — Login
Now that we are able to create new accounts, let's implement the login functionality. Firebase SDK takes intendance of all the dominance and authentication steps needed for a secure login.
Open LoginScreen.js, import firebase and complete the onLoginPress method:
Reload your app and go ahead and login with an existing account. The app should take y'all to the dwelling house screen if the credentials were right, or it will warning y'all with an error if annihilation went wrong.
7. Persist Login Credentials
You'll notice that if you quit the app and open up it again, it volition prove the login screen again. For a practiced user experience, we'd want to state all logged in users on the Home screen. No one wants to type in their login credentials every time they desire to use an app.
This is too known as persistent login. Fortunately, Firebase SDK takes care of this for the states, dealing with all the security concerns. Persistent login is enabled by default in Firebase, then all we need to do is fetch the currently logged in user.
Open up App.js and let's implement the persistent login feature:
onAuthStateChanged returns the currently logged in user. Nosotros and so fetch all the extra user data that we stored in Firestore, and set it on the current component's state. This will re-return the app component, which will display the Home screen.
Notice how nosotros call this the first fourth dimension the app loads by leveraging the useEffect hook.
8. Writing and Reading Data from Firebase Firestore
We've already used Firestore above, for saving extra information on our users (the total name). In this dedicated section, we're going to see how we can write data to Firestore, and how we tin query information technology.
We'll also embrace how to observe (mind to) changes in the Firestore collection and have those exist reflected on the screen, in real-fourth dimension. These can be very helpful in existent-time apps, such every bit a React Native Conversation.
To simplify, we are going to salve some text items into a Firestore collection named "entities". Call up of these as tasks, posts, tweets, anything you lot want. We'll create a simple file that adds a new entity and nosotros'll likewise listing all the entities that belong to the currently logged in user. Additionally, the list volition be updated in real-time.
- Implement HomeScreen.js by rewriting it to the code below
- Style the dwelling screen, by overriding HomeScreen/styles.js to:
- Reload the app and observe the new home screen. Type in some text and press the Add button
- Cypher happened.
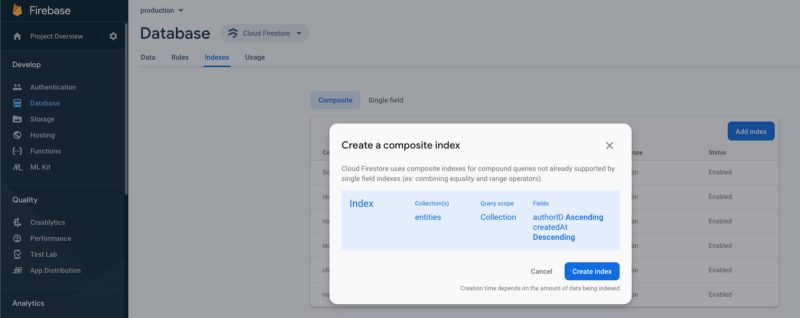
- Create an index on the entities Firestore collection
You'll notice that the list of entities is non rendered. If you bank check out the logs, y'all'll encounter an warning about "The query requires an index", followed by a long URL:

This informs us that we tin't query the entities tabular array by authorID and sort the data by createdAt in descending order, unless we create an index. Creating an index is actually really easy — only click on that URL so click the push button:
- Reload the app again
Now everything works as expected:
- The app lists all the entities in the entities collection, in descending creation order
- Calculation a new entity works fine
- The list updates in real-time (try deleting an entry directly in the database, or adding a new 1 directly from the app)
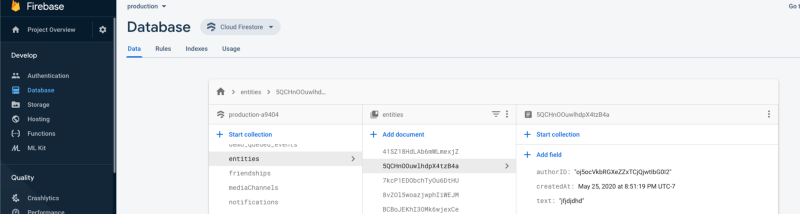
This is how your Firestore database looks like now:
This is how yous read and write from Firestore in React Native. Permit'due south motility forward to the last section.
Play around with the app, by adding new entities. This is the final projection:

Conclusion
Firebase makes it really easy to add authentication and database back up to any React Native app. Firebase SDK is extremely powerful, supporting a lot of common reading and writing database patterns.
In addition to React Native, Firebase SDK provides support for a lot of other languages, such equally Swift, Kotlin or Palpitate. Check out those links for similar Firebase starter kits in diverse languages.
Nosotros've showcased the well-nigh basic ones in this React Native Firebase tutorial. In the next series, nosotros'll cover more advanced features, such as Firebase Storage (file upload) and push notifications.
If you lot liked this tutorial, please give me a star on the Github repo and share this with your community. You lot can bank check out fifty-fifty more costless React Native projects on Instamobile. Cheers!
Learn to code for free. freeCodeCamp's open source curriculum has helped more than than 40,000 people go jobs as developers. Get started
Source: https://www.freecodecamp.org/news/react-native-firebase-tutorial/
0 Response to "Firebease There Was a Problem Contacting the Server. Try Uploading Your File Again"
Post a Comment